Sometimes it's necessary to set up a class such that only specific students can enroll. Curriculum Management provides two methods for accomplishing that goal: general and specific student permissions.
- General student permission numbers allow you to designate as many specific students for enrollment as you like. For example, if you're building a senior seminar class for an instructor who wants ten particular students to enroll, you can generate ten permission numbers and give one to each student.
- Specific student permission is somewhat different in that you designate a particular, individual student for enrollment. When that student enrolls in the class, the permission is attached to the student versus a generated number.
For an alternate look at setting up general and specific student permissions, including images of what the student sees on her side, reference the Create Enrollment Permissions topic.
Setting Up General Student Permissions
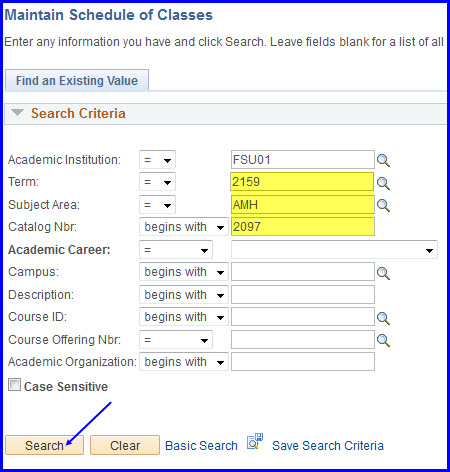
1. If you haven't already done so, navigate to Curriculum Management>Schedule of Classes>Maintain Schedule of Classes and search for the class for which you want to add general student permission.
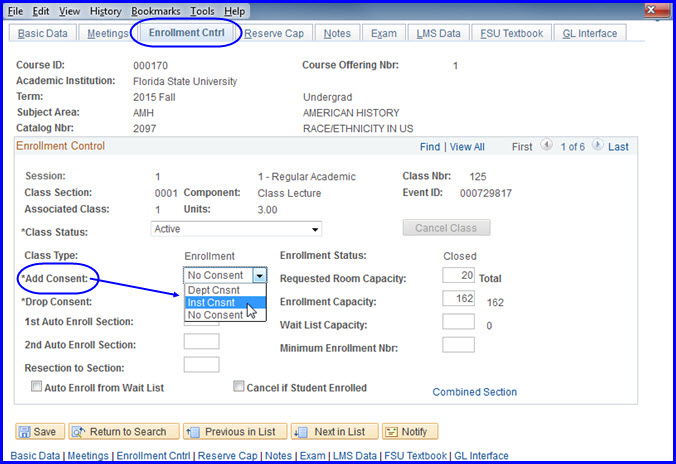
2. Click the Enrollment Cntrl tab, and in the Add Consent drop down box select either Dept or Inst Consent.
3. Navigate to Main Menu>Records and Enrollment>Term Processing>Class Permissions>Class Permissions. The Class Permissions screen appears with the Permission to Add tab active. (Ensure the correct class section is selected.)
NOTE: Under Permission Valid For the system provides default values. You can, and in many cases should, change these values.
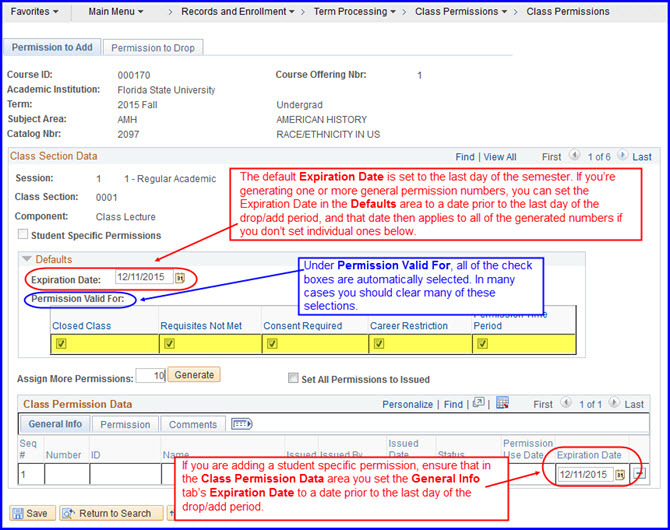
NOTE: The Defaults expiration date is set to the last day of the semester. If you're generating one or more general permission numbers, you can set the Expiration Date in the Defaults area to a date prior to the last day of the drop/add period, and that date then applies to all of the generated numbers if you don't set individual ones below. If you are adding a student specific permission, ensure that in the Class Permission Data area you set the General Info tab's expiration date to a date prior to the last day of the drop/add period.
4. In the Assign More Permissions text box, type the desired number of permissions (in this example-10) and click Generate.

5. Ten new permission numbers are generated.
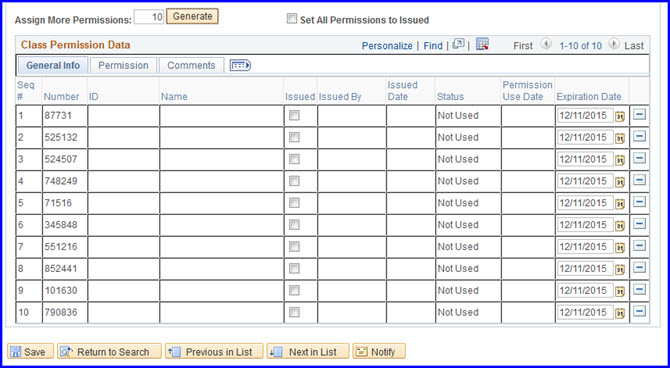
NOTE: A permission number can be used only one time. If you need more than the original amount of permissions you generated, simply enter the number required in the Assign More Permissions text box and click the Generate button again.
6. After the number is issued to a student, select the Issued check box.

NOTE: Click the expand button to see the General Info, Permission, and Comments tabs at a single glance.

7. If you do not expand, then on the Permission tab ensure only those categories the student should be able to override with the permission number are selected.

8. On the Comments tab, in the text box type any comments that provide further information about the number.

9. Click Save. On the General Info tab, the system populates the Issued By field with your CampusID.

NOTE: If you intend to issue all of the permissions at one time, you can select the Set All Permissions to Issued check box. After making this selection, the Issued By field is populated with your CampusID.

10. When the student enrolls, s/he will use this permission number in the Permission Nbr field on the Enroll>Add>Select classes to add-Enrollment Preferences page for the designated class section.
11. After the student applies the permission number, the General Info tab's Name field displays the student's name and the Permission Use Date field displays the date it was used.
Setting Up Specific Student Permissions
1. If you haven't already done so, navigate to Curriculum Management>Schedule of Classes>Maintain Schedule of Classes and search for the class for which you want to add general student permission.
2. Click the Enrollment Cntrl tab, and in the Add Consent drop down box select either Dept or Inst Consent.

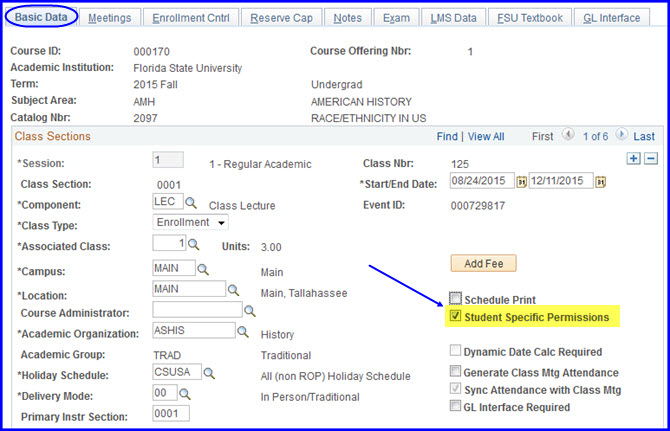
3. On the Basic Data tab select the Student Specific Permissions check box.
4. Navigate to Main Menu>Records and Enrollment>Term Processing>Class Permissions>Class Permissions. The Class Permissions screen appears with the Permission to Add tab active. (Ensure the correct class section is selected.)
5. In the ID field, type the student's EmplID or click the Look Up button to find the student.
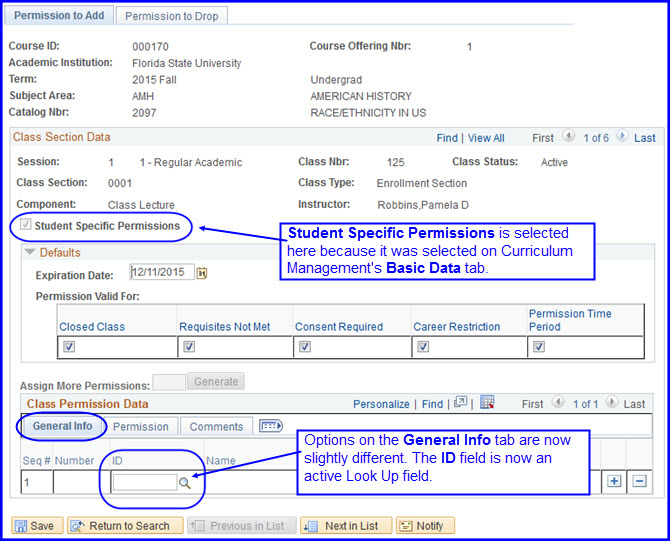
6. After the student enrolls in the class, the Permission Use Date field displays the date on which the student used the permission.

NOTE: A permission number is not generated when a student specific permission is created. Rather, the student's EmplID is associated with the class, and the levels of permission selected on the Class Permission Data's Permission tab are carried with that permission, which is in turn associated with the student. Thus, it remains important to accurately select permission types on the Permission tab.
