This How To topic covers the steps required to view and print transcripts. It also explains how to set a future date on which to print one or more unofficial transcripts.
Navigation
Main Menu>Records and Enrollment>Transcripts>Request Transcript Report
Roles
If you find that you do not have access to the navigational path above, you will need to request the appropriate role. For instructions on requesting roles through eORR, please reference the Requesting Roles topic.
- If your job responsibilities require you to look up individual transcripts, request the FSU_SR_TRANSCRIPT_UPDATE role.
- If your job responsibilities require you to do transcript batch processing in addition to looking up individual transcripts, request the FSU_SR_TRANSCRIPT_POWER role.
Steps
1. Upon following the navigation above, the Request Transcript Report search page appears. Click the Add a New Value tab.
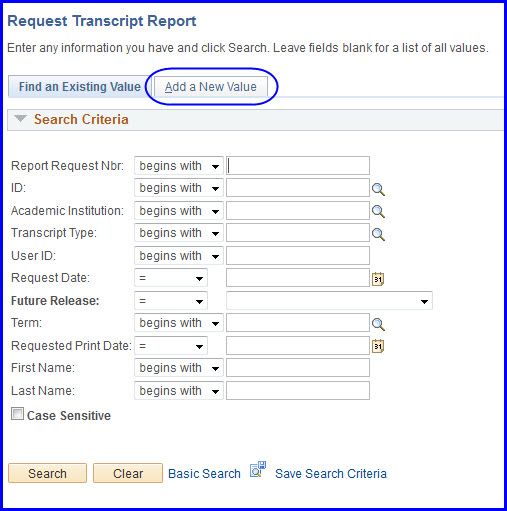
NOTE: You can remain on the Find an Existing Value tab if you know a transcript has already been generated for the student.
- You can search for the student and generate the transcript that appears at the bottom of the page.
- When you've chosen the transcript you want to generate, you can go to the transcript Request Detail tab and click the Process Request button to refresh the transcript, ensuring any changes that might have been made since the last time the transcript was generated are reflected in the current document.
TIPS:
- Alternately, on the Find an Existing Value tab, you can search by the Report Request Nbr, which will pull all of the transcripts requested in a single session.
OR
- Search by User ID (yours or another operator's) to pull all requests made by a specific person.
2. The Transcript Request Header tab appears. Select the type of transcript to access from the Transcript Type drop-down box. Transcript types include:
- OFFCH-Official Transcript - Charge
- OFFEC-Electronic Official Transcript - Charge
- OFFLW-Official Law Transcript - Charge
- OFFMD-Official Med Transcript - Charge
- OFFNC-Official transcript - NO charge
- OFLWN-Official Law Transcript - NO Charge
- OFMDN-Official Med Transcript - NO Charge
- UNOFF-Unofficial Transcript
NOTE: If any one of the Law or Med transcript types is chosen, the student's career must reflect Law or Med accordingly.
3. Select the Freeze Record check box if you want to keep this record from being lost in any future-date purge.
4. To generate the student's transcript regardless of any service indicators that are on the student's record, select the Override Service Indicator check box.
WARNING! If the student has a service indicator and you do not select this check box, the report request does not generate a transcript.
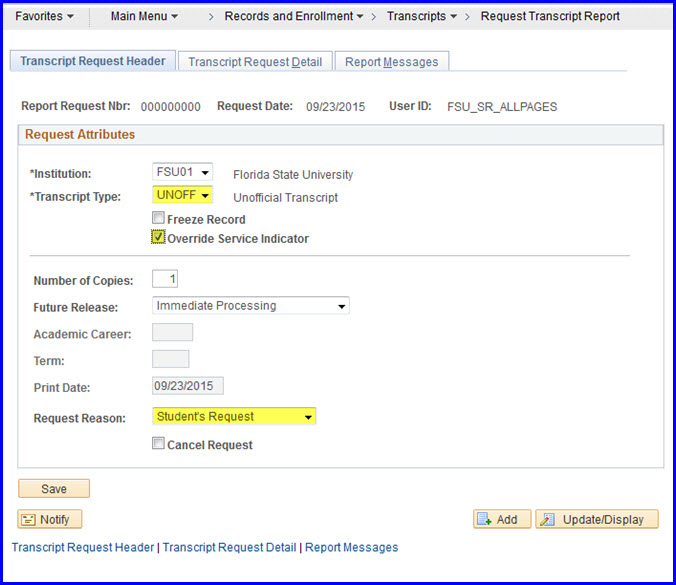
NOTE: The Future Release field defaults to the Immediate Processing value. For instructions on setting this field to a different value, see below.
5. Select a reason from the Request Reason drop-down box.
6. Click the Transcript Request Detail tab. Enter the student's EMPL ID in the ID field (or click the magnifying glass to access the Look Up ID page.)
NOTE: To request more than one transcript action in a session, click the Plus (+) button to add a row where you can input another student's ID.
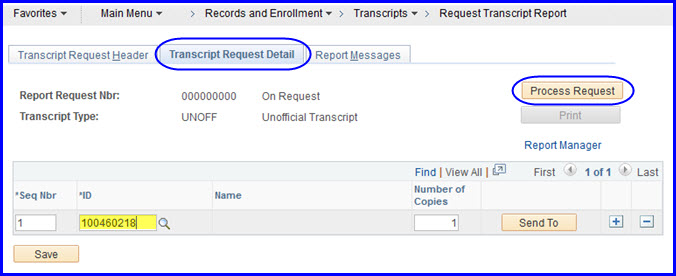
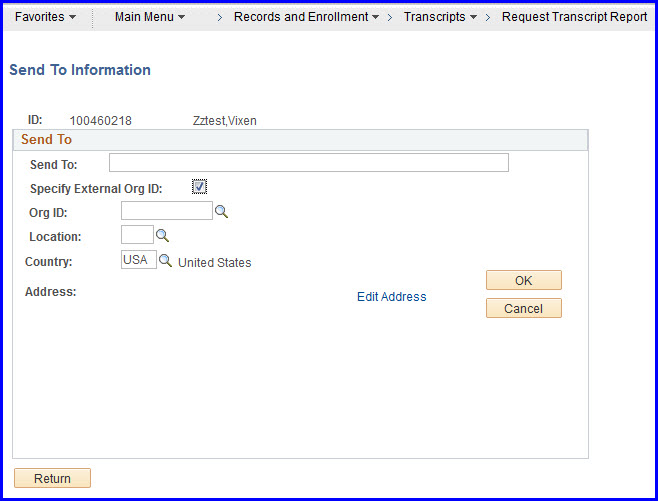
7. Click the Send To button. The Send To Information page appears.
NOTE: The address information determined here appears on the transcript such that when it is folded, the address appears in the window pane of the mailing envelope.
WARNING!
- If the transcript should be sent to an external organization or private address, always click the Send To button before initiating the transcript process request by clicking the Process Request button.
- If you click the Process Request button first, the Send To button is inactivated, and you must return to the Add a New Value tab and begin the transcript request again.
- KEEP IN MIND that if you chose a transcript that has an associated charge, you have processed that request, and the student will be charged.
- THEREFORE, to avoid charging the student twice, when you run the process request again select a transcript type that does NOT have a charge associated with it.
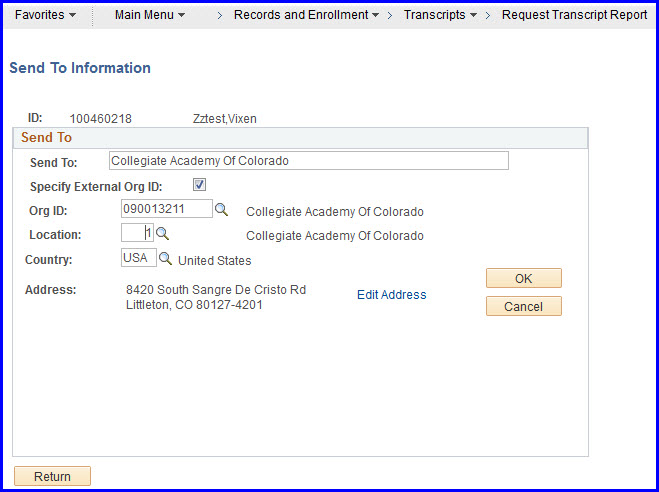
8. If you are sending the transcript to an external organization, click the Specify External Org ID check box. Making this selection activates the Org ID and Location look up fields.
NOTE: If you're sending the transcript to a private address, click the Edit Address link, and the Edit Address page appears where you can type a private address.
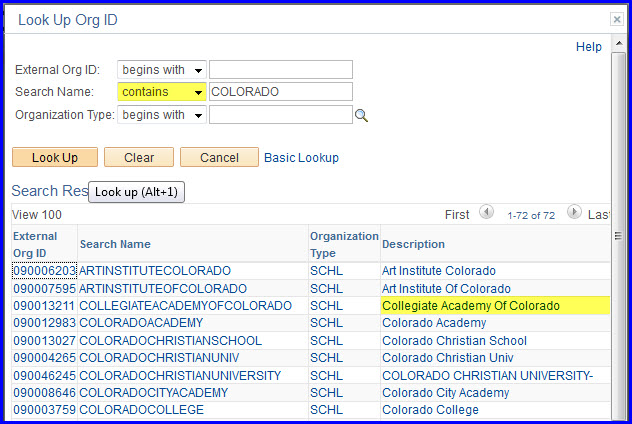
9. Click the Org ID look up button. The Look Up Org ID page appears. In this example, the staff person wanted to find Collegiate Academy of Colorado, so in the Search Name field, the contains operator was chosen, and Colorado was typed in the value field.
10. Upon clicking the Collegiate Academy of Colorado link, the Send To, Org ID, Country and Address information is populated. Click the Location ID Look Up to select the campus location to send to. In this example, location 1 was chosen.
11. Click OK to go back to the Transcript Request Detail page. Then, click the Process Request button.
NOTE: Alternately, if you are entering several transcript requests, click Save to have the individual requests save and process in the overnight batch job.
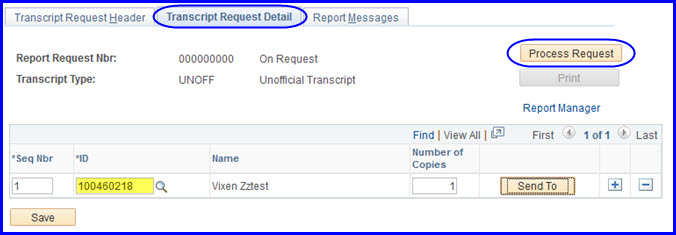
12. After clicking the Process Request button, the View Report link become active.
NOTE: Clicking either the Process Request button or Save generates the Report Request Nbr value.
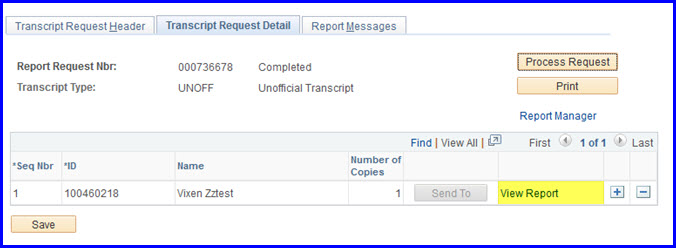
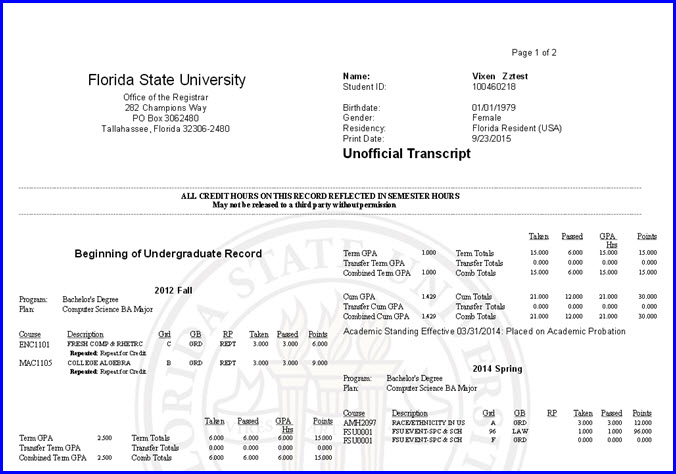
13. To view or print the transcript, click the View Report link, which generates a PDF report that appears in a new tab. You can print the PDF by selecting the browser menu's File>Print option.
NOTE: Do NOT click the Print button, as this print functionality is not currently in use!
CAUTION! You must allow pop-ups to have the PDF generate. For more information on enabling pop-ups, see the Allowing Pop-Ups section of the Browser Settings-Tips and Tricks topic.
EXAMPLE:
To Set a Future Date on Which to Print One or More Transcripts
1. To schedule a transcript to print on a specific date, on the Transcript Request Header tab, click the Future Release drop-down box and select one of the date options.
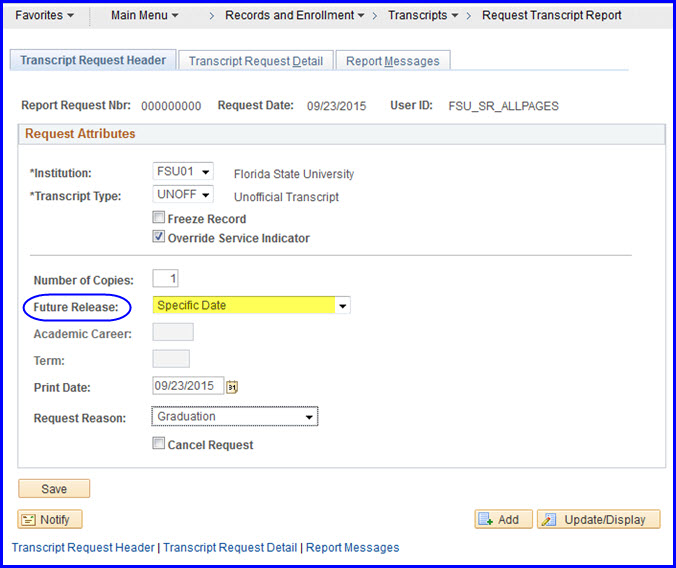
2. Selecting Hold, Specific Date, or Transfer Credit Post activates the Print Date field, where you choose the date on which to schedule the print job.
- For example, if you knew that a grade was set to post tomorrow, you could set the Future Release value to Hold and then select a date a few days hence to generate the transcript.

NOTE: The Degree Confer Date, Grades Post and Transfer Credit Post selections are tied to the academic calendar based on the student's career type. For example, if a Future Release value of Grades Post is selected, the Academic Career and Term fields activate. Use the Look Ups to choose the career type and term. In this example, the career type chosen is Undergraduate, and the term selected is Fall 2015. Based on these values, the system populates the Print Date field with the date that grades will post.

3. Click Save! Saving schedules your print job for the selected date.
4. Should you need to cancel the job, select the Cancel Request check box.

