At times administrative personnel need to acquire a roster of students from multiple class sections. This topic explains how to set up, run, and print a batch process that captures rosters based on the criteria you choose.
IMPORTANT! Many instructional staff circulate rosters as attendance sheets. Because rosters are used in this manner, they are not secure. The Policy Review Committee for the Student Central project, comprising members from the Faculty Senate Steering Committee, GPC, UPC, and Curriculum Committees determined that, to maintain the strict guidelines governing student privacy, the type of roster intended to be passed around as a sign-in sheet should be limited to the students' photos and EmplIDs. Therefore, rosters generated in the manner described here must not be used as attendance rosters!
Roles
If you have attended one of the Curriculum Management or Student Records training classes, you already will have at least one of the following roles allowing you access to this functionality.
- FSU_SR_DEPT_SCHEDULER
- FSU_SR_ENROLLMENT_STAFF_USERS
- FSU_SR_ENROLLMENT_SUPER_USER
If you have not attended a class, you must request the FSU_SR_CLASS_ROSTER role. Instructions for requesting a role through eORR are found at these locations:
Navigation
Log on to my.fsu.edu with your FSUID and password. On your Staff & Faculty portal page under the myFSU Links area, click the SC icon. Navigate to Main Menu>Curriculum Management>Class Roster>Print Class Roster.
Creating the Roster Batch
- The Run Control ID is simply a name for your roster batch. You can name the batch anything you like, but it's best to choose something descriptive so that if you create multiple roster batches they're easily distinguishable.
- Your college and/or department business needs will determine how many Run Control IDs you should set up. It's possible that you will need to set up only one Run Control ID that has a fairly generic name, like print_class_roster.
- If you create just one Run Control ID and find that you need to alter the values at a later time, you can do so.
- If you decide to save the new values to an existing Run Control ID, simply click the Save button before clicking Run.
- Alternately, you can choose Add a New Value (again) and create a distinct Run Control ID for a second, third, etc. roster batch.
- After you've created a Run Control ID, to access it again choose the Find An Existing Value tab and search for the previously defined Run Control ID.
1. If this is the first time you are running a roster batch, after navigating to the Print Class Roster page select the Add New Value tab.
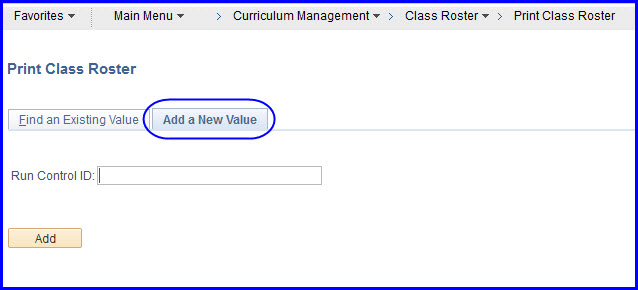
2. Choose a Run Control ID (name) for the roster batch and type it in the Run Control ID field and click Add. A Print Class Roster page with blank field values appears.
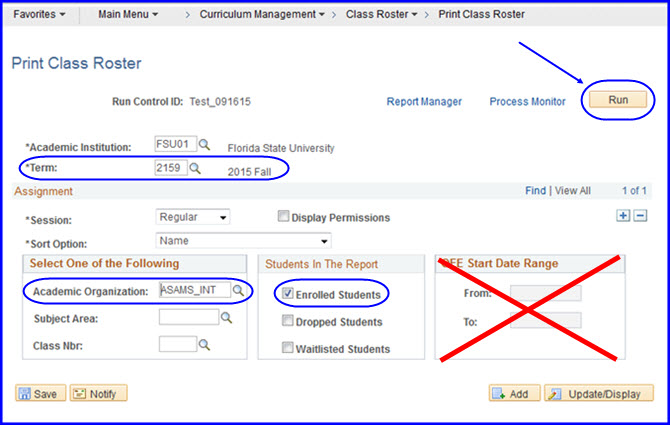
3. Select:
- A value for the Term field (in this example, Fall 2013-2139 is used).
- Just one value from the Select One of the Following box:
- Academic Organization: Is the equivalent of department. Select this option if you want to see a student roster for every class your department is offering, regardless of subject area. For example, if you choose BU, a roster is generated that includes all classes offered by Business (accounting, actuarial science, etc.)
- Subject Area: Is the equivalent of a single subject area, for example, French. Select this option if you require a roster for all French classes being offered for the term selected.
- Class Nbr (Legacy system = reference number): Is the equivalent of a single class roster. Select this option if you require a roster for a specific class section.
- Enrolled Students in the Students in The Report box. (If you also select Dropped Students, the report will show every student who added and subsequently dropped the class.)
- No values in the OEE Start Date Range box.
Click Run. The Process Scheduler Request page appears.
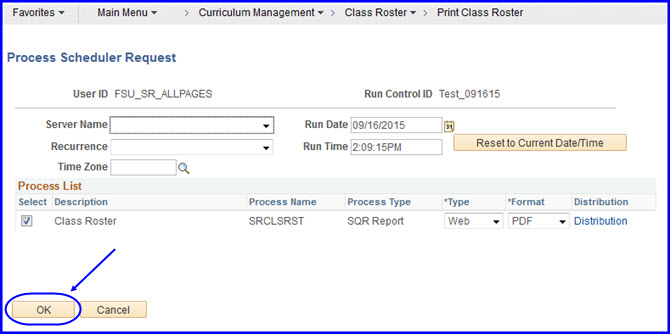
4. Click OK. The Print Class Roster page reappears.
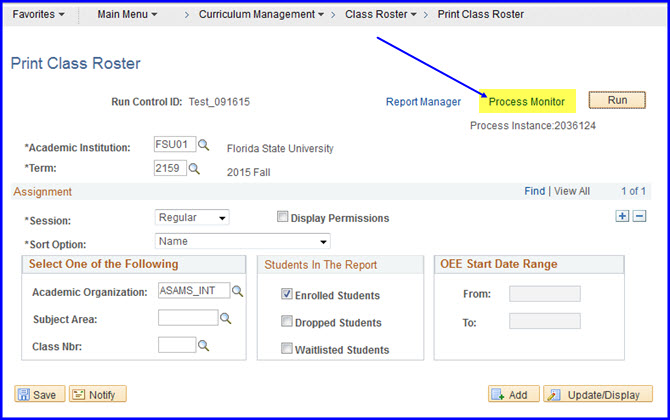
5. Click the Process Monitor link. A Process List appears.
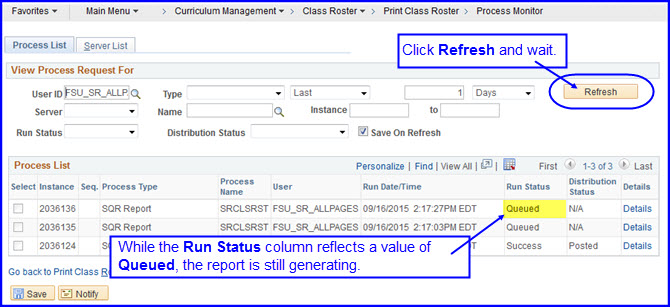
6. Click the Refresh button. Depending upon how much data is being returned, processing can take from a few seconds up to a minute or two.
IMPORTANT! Click the Refresh button off and on until you see that the Run Status column reflects a value of Success and the Distribution Status column reflects a status of Posted. (Until these statuses update, the Run Status value displayed is Queued.)
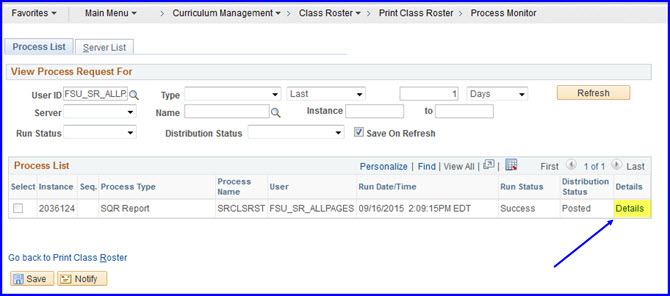
7. In the report row for the appropriate report, click the Details link (consult the Run Date/Time column if you're not sure, but the most recently run report will be uppermost in the list). The Process Detail page appears.
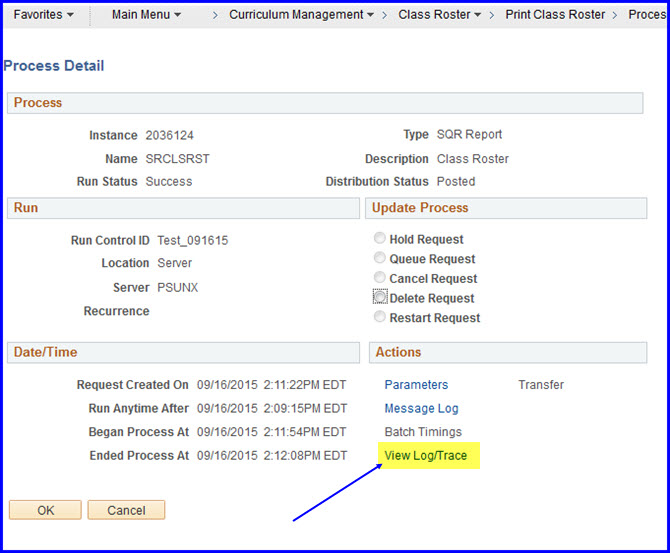
8. Click the View Log/Trace link. The View Log/Trace-File List page appears.
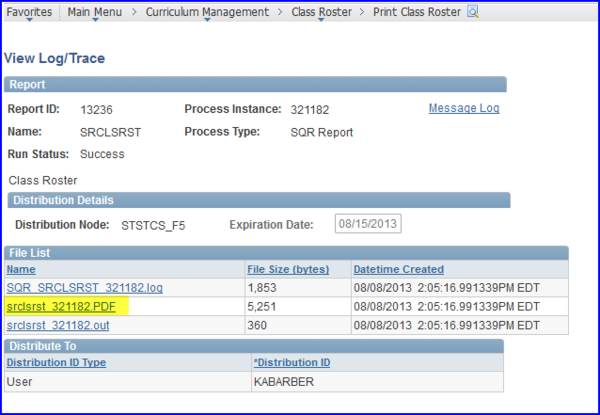
9. Click the PDF item in the list. The PDF downloads. If your computer blocks pop-ups, you may be prompted by the browser to approve the download. Approve this action for the download to complete.
NOTE: The generated PDF includes all instructors for the reported class sections. For example, if the class section has both a Primary Instructor of Record and a Grade Roster Delegate, both names appear. At this time, there is no method for curtailing the instructor field to just the Primary Instructor of Record.
